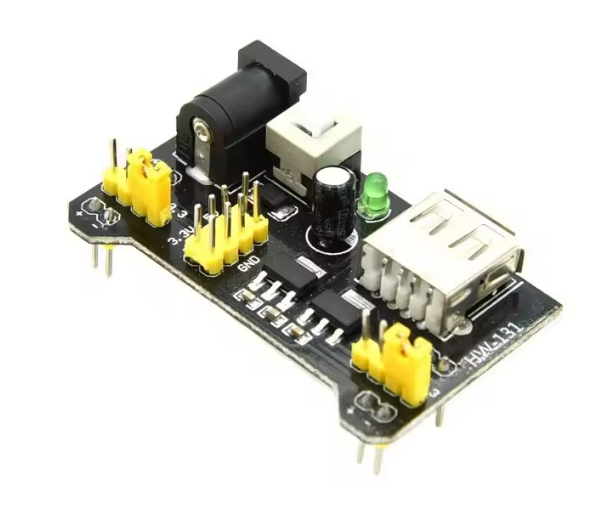
MB102 Breadboard Power Supply Module, Dual Rail 5V/3.3V Regulator Board, Mini USB + DC Jack Input, On/Off Switch, 2-Channel Output for 830/400 Tie-Point Breadboards, Arduino Compatible
Verified listing

MB102 Breadboard Power Supply Module, Dual Rail 5V/3.3V Regulator Board, Mini USB + DC Jack Input, On/Off Switch, 2-Channel Output for 830/400 Tie-Point Breadboards, Arduino Compatible

SKU: DIY-031 · Barcode: DIY-031
AED 10.39
In stock · 5 units Only 5 left Ships from Dubai
Find similar
Free delivery Orders over AED 100
Returns policy 14-day returns if unused
Tech help Wiring & code support
More options
Free shipping on orders AED 100+. Below that: AED 25.

The MB102 Breadboard Power Supply Module is a simple, reliable way to power your breadboard projects with clean, regulated 3.3V or 5V without messy wiring. Designed to plug directly into standard MB102 / 830-point solderless breadboards, it delivers power to the left and right rails independently, letting you run 5V on one side and 3.3V on the other—perfect for mixed-voltage Arduino, ESP8266/ESP32, sensors, logic modules, and prototypes.

This module is a go-to tool for hobbyists, students, and engineers because it gives you a neat “bench supply” experience right on the breadboard: plug in power, switch ON, select the voltage per rail, and start building.

What it does (in plain terms)

  • Takes power from Mini USB (5V) or a DC barrel jack
  • Regulates it to stable 3.3V / 5V
  • Feeds your breadboard’s power rails through the header pins
  • Lets you choose 3.3V or 5V per side using jumpers
  • Includes an ON/OFF switch so you can safely power-cycle your circuit

Key Features & Benefits

  • 2-Channel Output (Left + Right Rails): Power two rails independently for different voltage needs
  • Selectable 3.3V / 5V per Rail: Quick jumper selection without rewiring
  • Two Input Options: Use Mini USB 5V for convenience, or DC barrel input for flexibility
  • Breadboard-Ready Design: Drops into the breadboard power header area (MB102 layout)
  • ON/OFF Switch + Power LED: Easy control and quick status at a glance
  • Arduino Compatible: Ideal companion for Arduino UNO/Nano/MEGA prototypes and sensor testing

Specifications

ItemDetails
Module TypeMB102 Breadboard Power Supply
Output Channels2 rails (Left + Right)
Output Voltage3.3V or 5V selectable (per channel via jumpers)
Input OptionsMini USB (5V) and DC barrel jack
Recommended DC Jack InputCommonly ~6.5V–12V DC (varies by regulator/board version)
Typical Current CapabilityUp to ~700mA total (practical depends on input voltage, heat, airflow)
ControlsON/OFF switch, power LED
FitmentStandard MB102 / 830-point solderless breadboards

Current note: Regulators generate heat, especially when converting from higher input voltage down to 5V/3.3V. For higher loads, use lower input voltage (where appropriate) and ensure airflow.

Pin/Interface Overview (What you’ll see on the board)

Most MB102 modules include:

  • Two yellow jumper blocks (one per rail): choose 3.3V / 5V / OFF depending on board markings
  • Breadboard rail output pins: plug directly into the breadboard power rails
  • Mini USB port: convenient 5V input
  • DC barrel jack: alternate input (common for adapters)
  • ON/OFF switch: cuts output power cleanly
  • Power indicator LED: shows when output is enabled

(Exact silkscreen labels can vary slightly by batch, but function is the same.)

How to Use (Quick Setup)

  1. Insert the module into the breadboard’s power input area (aligned to the +/– rails).
  2. Choose your input:
    • Mini USB for 5V power (easy and common)
    • DC barrel jack if you’re using an external adapter
  3. Set each rail voltage using the jumpers:
    • Left rail: 3.3V or 5V
    • Right rail: 3.3V or 5V
  4. Toggle the switch ON. The LED should light.
  5. Connect your components to the breadboard rails and start prototyping.

Best Practices / Safety Tips

  • If your project draws more current (motors, servos, many LEDs), consider a stronger regulated supply.
  • Using a higher DC input increases regulator heat—keep loads reasonable.
  • Always power OFF before moving jumpers or rewiring critical parts of the circuit.
  • For sensitive sensors, keep wiring short and avoid noisy loads on the same rail.

Common Applications

  • Arduino breadboard prototyping
  • ESP32/ESP8266 + sensor testing (3.3V rail)
  • Logic level experiments (3.3V & 5V on separate rails)
  • Quick power for modules: OLED, I2C sensors, RF modules, relays (check voltage needs)
  • Education labs and STEM kits
Full description

The MB102 Breadboard Power Supply Module is a simple, reliable way to power your breadboard projects with clean, regulated 3.3V or 5V without messy wiring. Designed to plug directly into standard MB102 / 830-point solderless breadboards, it delivers power to the left and right rails independently, letting you run 5V on one side and 3.3V on the other—perfect for mixed-voltage Arduino, ESP8266/ESP32, sensors, logic modules, and prototypes.

This module is a go-to tool for hobbyists, students, and engineers because it gives you a neat “bench supply” experience right on the breadboard: plug in power, switch ON, select the voltage per rail, and start building.

What it does (in plain terms)

  • Takes power from Mini USB (5V) or a DC barrel jack
  • Regulates it to stable 3.3V / 5V
  • Feeds your breadboard’s power rails through the header pins
  • Lets you choose 3.3V or 5V per side using jumpers
  • Includes an ON/OFF switch so you can safely power-cycle your circuit

Key Features & Benefits

  • 2-Channel Output (Left + Right Rails): Power two rails independently for different voltage needs
  • Selectable 3.3V / 5V per Rail: Quick jumper selection without rewiring
  • Two Input Options: Use Mini USB 5V for convenience, or DC barrel input for flexibility
  • Breadboard-Ready Design: Drops into the breadboard power header area (MB102 layout)
  • ON/OFF Switch + Power LED: Easy control and quick status at a glance
  • Arduino Compatible: Ideal companion for Arduino UNO/Nano/MEGA prototypes and sensor testing

Specifications

ItemDetails
Module TypeMB102 Breadboard Power Supply
Output Channels2 rails (Left + Right)
Output Voltage3.3V or 5V selectable (per channel via jumpers)
Input OptionsMini USB (5V) and DC barrel jack
Recommended DC Jack InputCommonly ~6.5V–12V DC (varies by regulator/board version)
Typical Current CapabilityUp to ~700mA total (practical depends on input voltage, heat, airflow)
ControlsON/OFF switch, power LED
FitmentStandard MB102 / 830-point solderless breadboards

Current note: Regulators generate heat, especially when converting from higher input voltage down to 5V/3.3V. For higher loads, use lower input voltage (where appropriate) and ensure airflow.

Pin/Interface Overview (What you’ll see on the board)

Most MB102 modules include:

  • Two yellow jumper blocks (one per rail): choose 3.3V / 5V / OFF depending on board markings
  • Breadboard rail output pins: plug directly into the breadboard power rails
  • Mini USB port: convenient 5V input
  • DC barrel jack: alternate input (common for adapters)
  • ON/OFF switch: cuts output power cleanly
  • Power indicator LED: shows when output is enabled

(Exact silkscreen labels can vary slightly by batch, but function is the same.)

How to Use (Quick Setup)

  1. Insert the module into the breadboard’s power input area (aligned to the +/– rails).
  2. Choose your input:
    • Mini USB for 5V power (easy and common)
    • DC barrel jack if you’re using an external adapter
  3. Set each rail voltage using the jumpers:
    • Left rail: 3.3V or 5V
    • Right rail: 3.3V or 5V
  4. Toggle the switch ON. The LED should light.
  5. Connect your components to the breadboard rails and start prototyping.

Best Practices / Safety Tips

  • If your project draws more current (motors, servos, many LEDs), consider a stronger regulated supply.
  • Using a higher DC input increases regulator heat—keep loads reasonable.
  • Always power OFF before moving jumpers or rewiring critical parts of the circuit.
  • For sensitive sensors, keep wiring short and avoid noisy loads on the same rail.

Common Applications

  • Arduino breadboard prototyping
  • ESP32/ESP8266 + sensor testing (3.3V rail)
  • Logic level experiments (3.3V & 5V on separate rails)
  • Quick power for modules: OLED, I2C sensors, RF modules, relays (check voltage needs)
  • Education labs and STEM kits
Customer reviews

No reviews yet — be the first.

Honest takes from buyers who built with this part.

Write a review

Customer Q&A

No questions yet.

Ask anything — the team and other customers will reply.

No questions yet. Be the first to ask — useful answers help other buyers too.

Ask a question

Starter Bundle Builder

Select compatible items and add all selected products in one click.
4 compatible items
View cart

Works With

Find more compatible parts

Related